logoHomeschool Science Curriculum
Sample Lesson - The Treasure Map
treasure map 1 MAGNETISM
LESSON 6

Our Story:

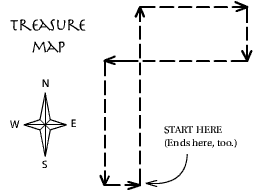
You are exploring a beach that was once a hide-away for pirates and smugglers. You try to climb SKULL ROCK for a look around, but as you reach the top the ground shakes, the rock splits and you fall into the rock! You land on a clay jar that shatters. In this jar you find an old parchment.

Treasure Map 2
What You Need

A compass (one comes in the kit), a large rock, and a big yard or field. Also, this activity is more interesting if you work with a friend, brother or sister.


What To Do:

Go outside to a yard or field. Put a large rock down to mark your starting spot. This will be your SKULL ROCK.

Pace off the directions on the parchment to see where you end up.

Just point yourself North, South, East or West, whatever the parchment says. Then take one step for each pace. Use your compass to tell you which way is which.

Do you know how to use a compass?
Hold it level, and turn it so that the arrow points to the N. As long as you keep the arrow on the N, the compass will tell you which way East, West, South & North are.
Bad Compass
Wrong
Bad Compass
Wrong
Good Compass
This is correct!
The red arrow always points North; the back end of the arrow points South.
East is to the arrow's right; West is to the arrow's left.

Treasure Chest

Finish pacing off the directions. Then answer these questions to see how you did:

How far from SKULL ROCK was the treasure buried? (That is, how far from skull rock did you end up?)

Did you find any treasure?


Amazing Pirate Pacing Fact

You can pace off the directions in ANY ORDER, you'll wind up at the SAME SPOT! Try it!

If you enjoy using your compass you could make a treasure map for a friend, brother or sister. Hide something like chocolate coins for the treasure. Tell them where to start and give them a sheet with the directions on it. Don't make it too hard! Remember: different people have different sized steps.

Pirate

Entry from the parent guide

MAGNETISM LESSON 6

The Treasure Map

Lesson Notes:
  • We are ignoring the correction for the difference between magnetic north and geographic north. This will not interfere in any way with the lesson. It also doesn't matter how large the child's paces are, as long as the size of pace is consistent.
  • Most children are likely to need a little help learning how to use their compass to determine direction. Example: suppose you want to walk eight paces west. Turn the compass so the red end of the needle points to the N. The W will point left. Just turn left and walk eight paces.
  • If your children decide to make their own treasure map, as it suggests at the end of the lesson, they'll have the best success if they keep it outdoors, away from metal, and keep it simple, remembering that tiny errors are magnified with each new direction.

Objectives: Through completing this lesson the child will: 1) Apply knowledge of the Earth's magnetic field to a problem solving situation; 2) Use a compass to determine direction, and to navigate.

Key:

pacing map

Since people are not machines and their paces are not all exactly the same size, the child may be off a little.

  • How far from skull rock was the treasure buried? [Zero paces]
  • Did you find any treasure? [If knowledge is treasure, then I have been made rich.]
Further Explorations (optional): A pacing map is a vector map. (A vector is something that has a size, such as 3 paces, and a direction, such as east.) Vectors can always be added in any order. You can try it with the pacing instructions in the lesson, or come up with your own instructions. If you want to verify this but don't want to pace it off, just use a sheet of graph paper, with each square representing a pace.
©2006 by Stratton House

Back to: More Sample Lessons | The Magnetism Adventure
Home Page | Site Map